Boilsoft ALAC to FLAC Converter tutorial
ALAC files can be effortlessly turned into FLAC by using our ALAC to FLAC Converter.
Glossary:
Apple Lossless (also known as Apple Lossless Encoder, ALE, or Apple Lossless Audio Codec, ALAC) is an audio codec developed by Apple Inc. for lossless data compression of digital music.Apple Lossless data is stored within an MP4 container with the filename extension .m4a. It is not a variant of AAC (which is a lossy format), but a distinct lossless format that uses linear prediction similar to other lossless codecs such as FLAC and Shorten.All current iPod players can play Apple Lossless-encoded files. It does not use any digital rights management (DRM) scheme, but by the nature of the container, it is thought that DRM could be applied to ALAC much the same way it can with other files in QuickTime containers.
Free Lossless Audio Codec (FLAC) is an audio compression codec primarily authored by Josh Coalson and Ed Whitney. As its name implies, FLAC employs a lossless data compression algorithm: a digital audio recording compressed by FLAC can be decompressed into an identical copy of the original audio data. Audio sources encoded to FLAC are typically reduced to 50–60% of their original size.
How to convert ALAC to FLAC?
First, download, install and run Boilsoft Audio Converter on your Mac or Windows.
![]()
![]()
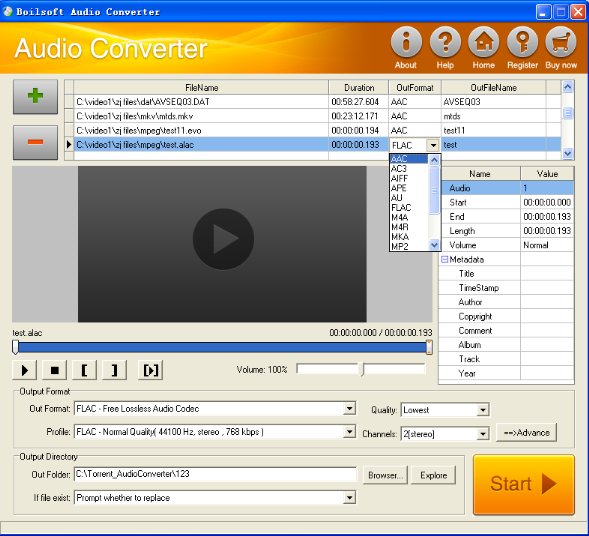
(Boilsoft Audio Converter for Windows)
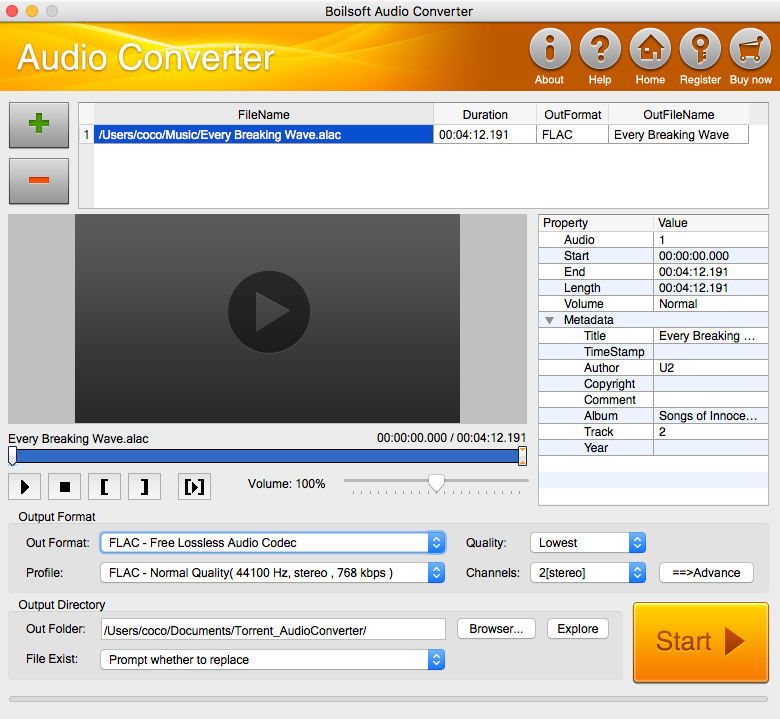
(Boilsoft Audio Converter for Mac)
Step 1 Add ALAC audio
Click Add to add the ALAC files you want to convert, then select FLAC as the output format.
Step 2 Select audio segment (Optional)
With Boilsoft Audio Converter, you can convert the whole song or a segment.
Press
![]() to play the selected audio alac file. Press
to play the selected audio alac file. Press
![]() to stop.
to stop.
When you want to designate the segment, you can press
![]() to set starting time and
to set starting time and
![]() ending time.
ending time.
Press
![]() to listen to the selected segment.
to listen to the selected segment.
Step 3 Customize output audio (Optional)
As can be seen from the diagram, the panel allows you to set the expected volume and output format of the audio, and to customize the sample rate, Bit rate and channels the audio will contain.
Step 4 Customize the metadata information (Optional)
We can see from the picture that the metadata information of the output audio, such as title, author, copyright, comment, album, track, can be customized merely by typing in what you want to display
Step 5 Click Start
When all settings are completed, just press Start Button to gain your favorite FLAC from your output directory soon.
Read More:
- How to convert Apple Music M4P songs to mp3 without downloading them?
- How to convert Spotify to mp3?
- How to convert aa/aax to mp3?
- How to convert M4P to MP3?
- How to convert iTunes M4V movies/TV shows to MP4?
Looking for something different?

Tutorials

Copyright © 2023 Boilsoft Systems International Inc. All rights reserved.