Home > Boilsoft Audio Converter > Formats > OFR to AC3
Boilsoft OFR to AC3 Converter tutorial
Whenever you want to convert OFR to AC3, our smart OFR to AC3 Converter is your best choice.
Glossary:
OptimFROG(OFR) is a free lossless audio codec, known by its very high compression ratios. OptimFROG is developed by Florin Ghido. OptimFROG usually obtains the best lossless audio compression ratios on comparisons against other lossless encoders (practically a tie with the current champion LA). It has Windows and Linux versions, fully-featured input plug-ins for the foobar2000, Winamp2, Winamp3, dBpowerAMP, XMPlay and XMMS audio players (with bitstream error resilience, ID3v1.1 and APEv2 read tagging support), optimal support for all integer PCM WAV formats up to 32 bits and an extensible streamable (error tolerant) compressed format.
Dolby Digital AC-3 is the common version containing up to six discrete channels of sound. The most elaborate mode in common usage involves five channels for normal-range speakers (20 Hz – 20,000 Hz) (right front, center, left front, rear right, rear left) and one channel (20 Hz – 120 Hz allotted audio) for the subwoofer driven low-frequency effects. Mono and stereo modes are also supported. AC-3 supports audio sample-rates up to 48 kHz. Batman Returns was the first film to use Dolby Digital technology when it premiered in theaters in Summer 1992. The Laserdisc version of Clear and Present Danger featured the first Home theater Dolby Digital mix in 1995.
How to convert?
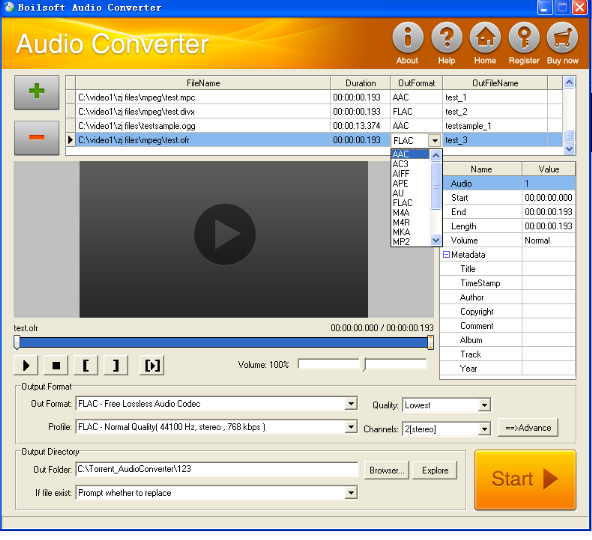
Step 1 Add video or audio formats
Press Add to add the OFR you want to convert, then select AC3 as the output format.
Step 2 Edit the file (Optional)
Press
![]() to play the files and the timer will start to work. Press
to play the files and the timer will start to work. Press
![]() to stop.
to stop.
This feature is designed for you to measure your favorite segment.
When you want to designate the segment, you can press
![]() to set starting time and
to set starting time and
![]() ending time.
ending time.
Press
![]() to listen to the selected segment.
to listen to the selected segment.
Step 3 Customize the audio (Optional)
As can be seen from the diagram, the panel allows you to set the expected volume and output format of the audio, and to customize the sample rate, Bit rate and channels the audio will contain.
Press
![]() to listen to the audio.
to listen to the audio.
Step 4 Customize the metadata information (Optional)
We can see from the picture that the metadata information of the output audio, such as title, author, copyright, comment, album, track, can be customized merely by typing in what you want to display.
Step 5 Get your cool melody
When all settings are completed, just press Start Button to gain your favorite AC3 from your output directory soon.
Tutorials

Copyright © 2023 Boilsoft Systems International Inc. All rights reserved.