Boilsoft DAT to M4A Converter tutorial
Merely by a series of clicks, a fashionable ringtone format will be provided by our DAT to M4A Converter!
Glossary:
DAT (Digital Audio Tape) is a standard medium and technology for the digital recording of audio on tape at a professional level of quality. A DAT drive is a digital tape recorder with rotating heads similar to those found in a video deck. Most DAT drives can record at sample rates of 44.1 kHz, the CD audio standard, and 48 kHz. DAT has become the standard archiving technology in professional and semi-professional recording environments for master recordings. Digital inputs and outputs on professional DAT decks allow the user to transfer recordings from the DAT tape to an audio workstation for precise editing. The compact size and low cost of the DAT medium makes it an excellent way to compile the recordings that are going to be used to create a CD master.
M4A, widely used as a ringtone format, refers to MPEG-4 Part 14 or MP4 file format, formally ISO/IEC 14496-14:2003, is a multimedia container format standard specified as a part of MPEG-4. It is most commonly used to store digital video and digital audio streams, especially those defined by MPEG, but can also be used to store other data such as subtitles and still images. Like most modern container formats, MPEG-4 Part 14 allows streaming over the Internet. A separate hint track is used to include streaming information in the file. The official filename extension for MPEG-4 Part 14 files is .mp4, thus the container format is often referred to simply as MP4.
How to convert?
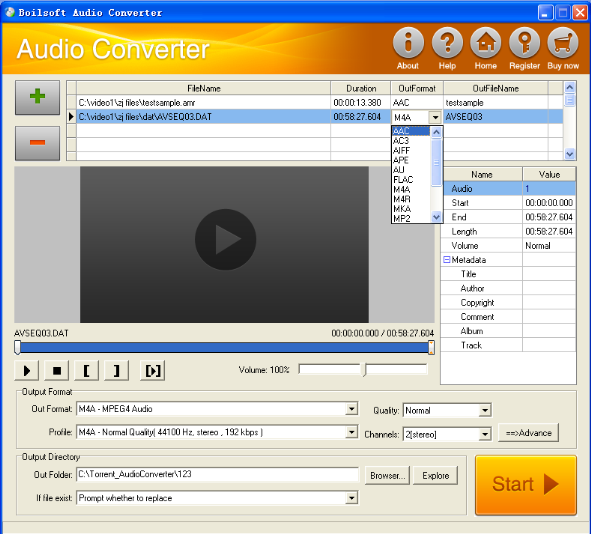
Step 1 Add video or audio formats
Press Add to add the DAT files you want to convert, then select M4A as the output format.
Step 2 Edit the file (Optional)
Press
![]() to play the files and the timer will start to work. Press
to play the files and the timer will start to work. Press
![]() to stop.
to stop.
This feature is designed for you to measure your favorite segment.
When you want to designate the segment, you can press
![]() to set starting time and
to set starting time and
![]() ending time.
ending time.
Press
![]() to listen to the selected segment.
to listen to the selected segment.
Step 3 Customize the audio (Optional)
As can be seen from the diagram, the panel allows you to set the expected volume and output format of the audio, and to customize the sample rate, Bit rate and channels the audio will contain.
Press
![]() to listen to the audio.
to listen to the audio.
Step 4 Customize the metadata information (Optional)
We can see from the picture that the metadata information of the output audio, such as title, author, copyright, comment, album, track, can be customized merely by typing in what you want to display!
Step 5 Get your cool melody
When all settings are completed, just press Start Button to gain your favorite m4a from your output directory soon.
Tutorials

Copyright © 2023 Boilsoft Systems International Inc. All rights reserved.